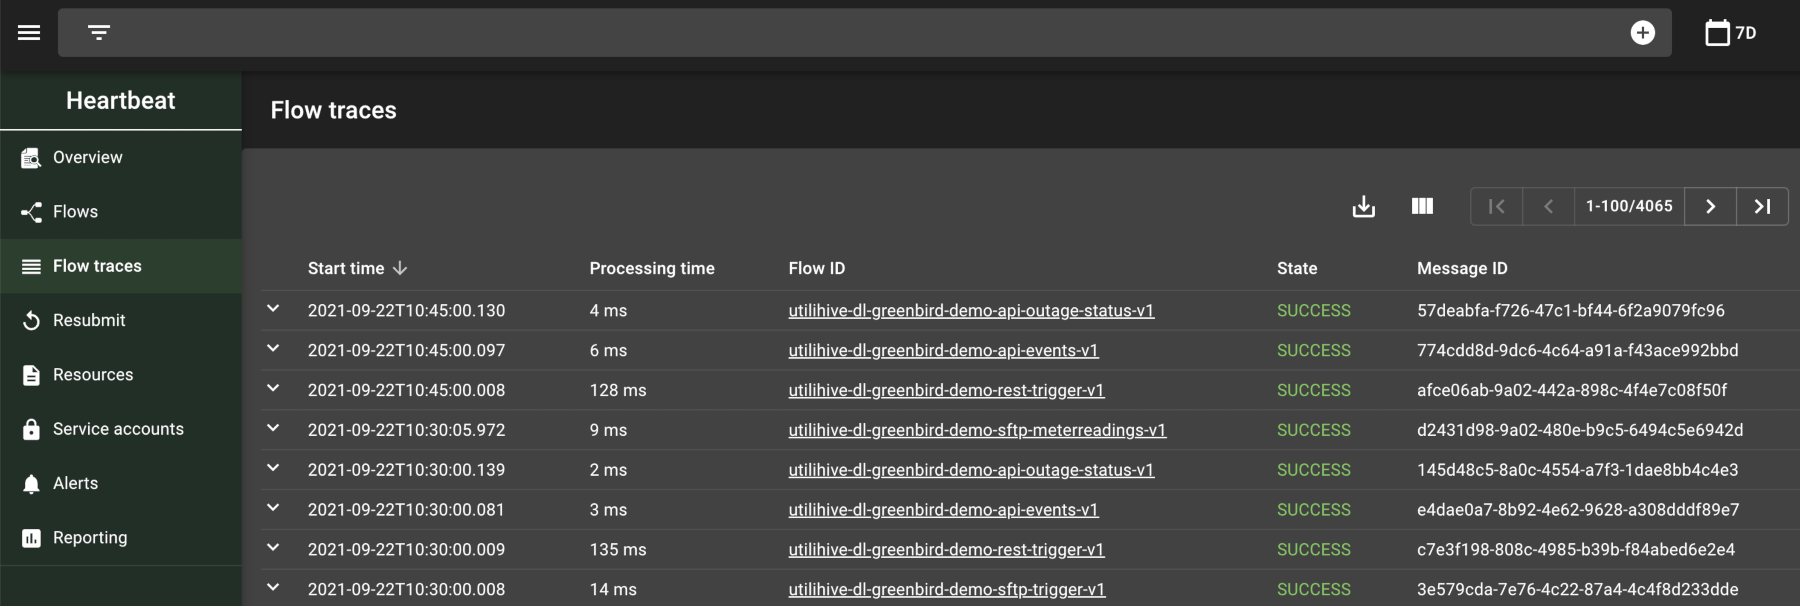
Flow Traces
Select "Flow traces" from the left navigation menu to view a list of all messages processed across all flows in the given time range. The following image shows flow traces from the past seven days:
Filtering
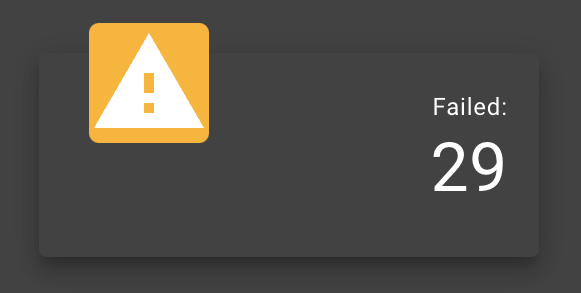
You can also navigate to the Flow Traces page by selecting a message count button, either from the main overview page or an individual flow’s page. For example, the message count in the following image acts as a button to filter by failed message:
If this was a button on an individual flow’s page, a filter for that flow ID would also be applied. You can add additional filters by selecting the search bar at the top of the page. The following image demonstrates this search bar with a few filters already in place and another being added:
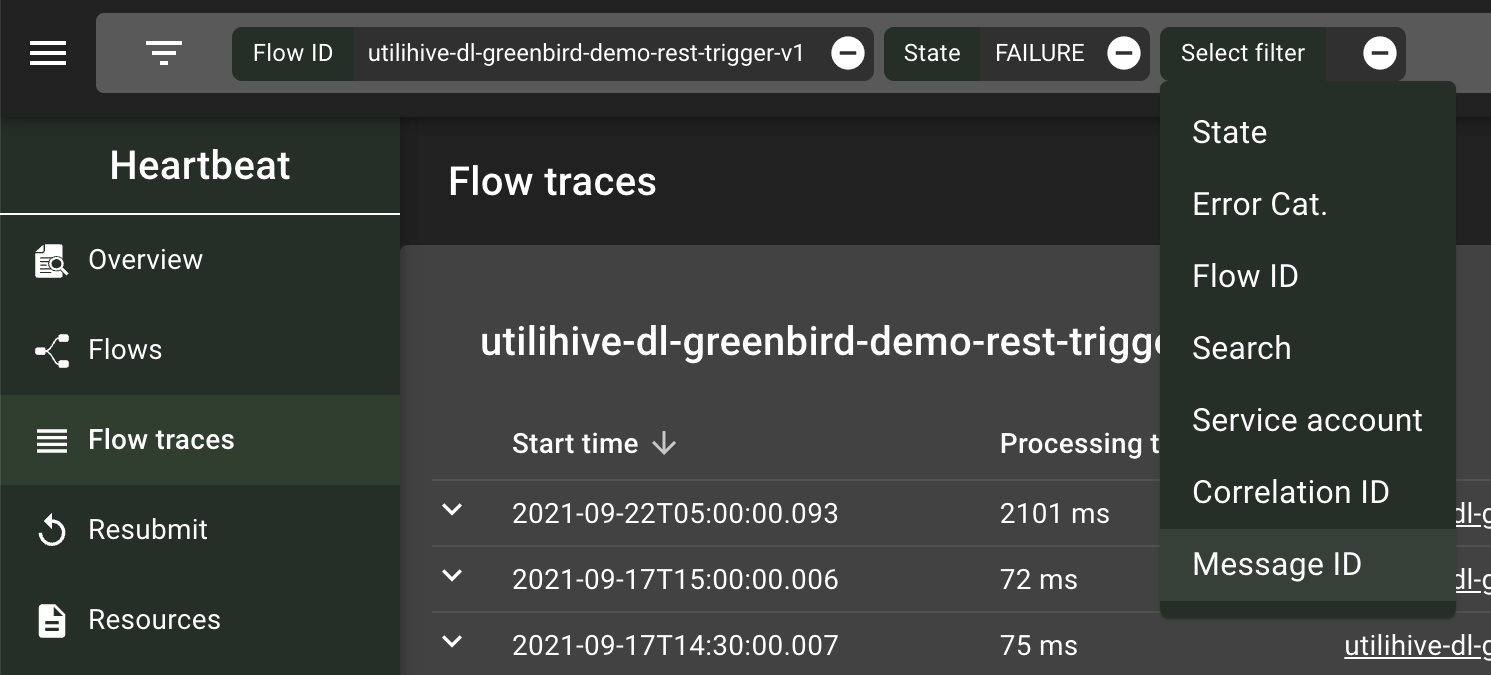
| The Beatbox filter is used to narrow the list down to flows on a specific Beatbox installation. If "Beatbox: Cloud" is selected, however, then all Beatbox flow traces are excluded. You can also double-click the name of the Beatbox in the filter to search by ID instead. |
Downloading Traces
The filtered flow traces can be downloaded as a CSV file by selecting the save button ( ![]() ). The CSV file will include the following values, regardless of which columns are actually present on the page:
). The CSV file will include the following values, regardless of which columns are actually present on the page:
START_TIME;END_TIME;PROCESSING_TIME;ORIGIN;FLOW_ID;FLOW_NAME;STATE;PRINCIPAL;MESSAGE_SIZE;MESSAGE_ID;CORRELATION_ID;ERROR_CATEGORIES
The column "PRINCIPAL" in the CSV file is the same as "Service account" in Utilihive Heartbeat.
Inspecting Failed Messages
Expanding a message in the flow traces list will reveal the number of delivery attempts made. Selecting a delivery attempt will then reveal the sequences of events/processors that the message went through. The following image demonstrates the flow trace for a failed message:
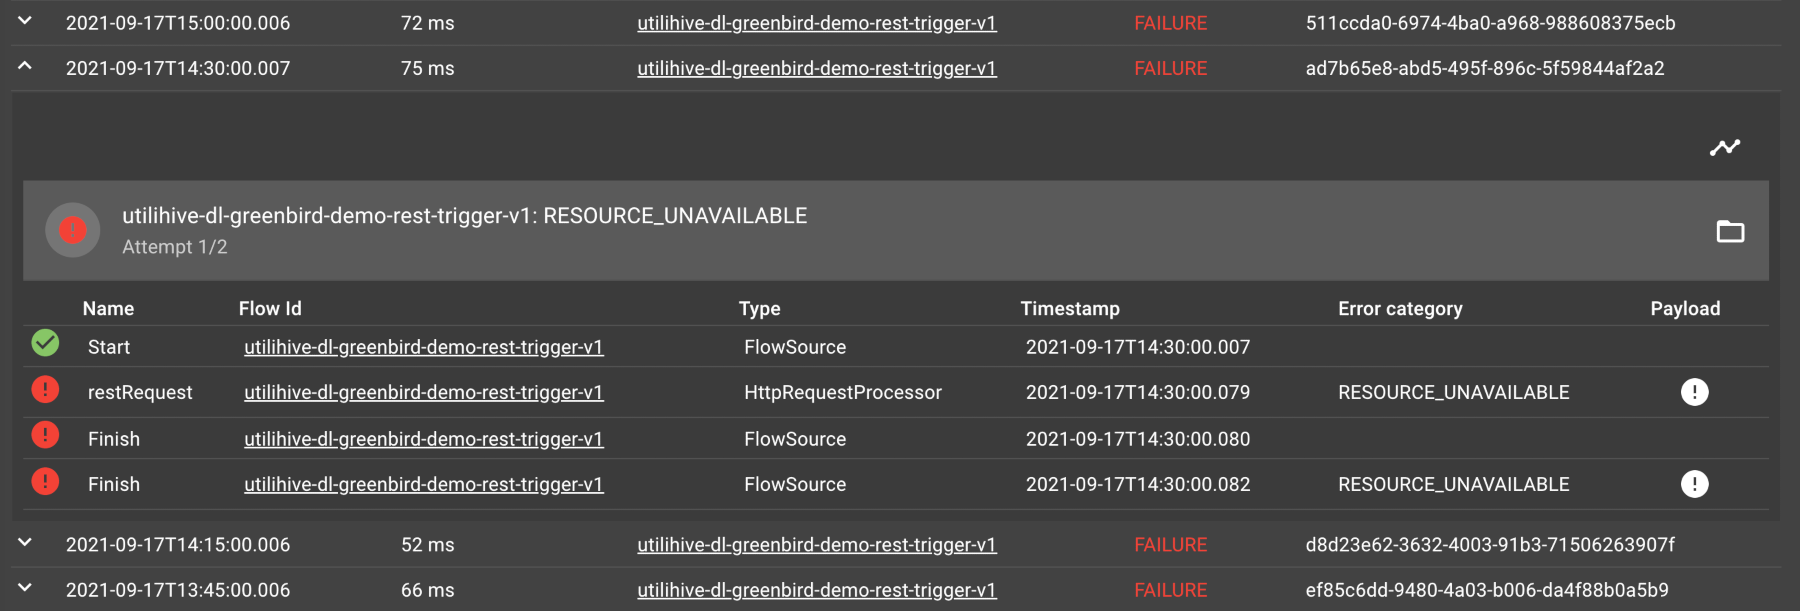
Selecting either the folder button ( ![]() ) or error button (
) or error button ( ![]() ) will display the error messages that came through in the payload. The following image displays the payload for a failed
) will display the error messages that came through in the payload. The following image displays the payload for a failed restRequest processor:
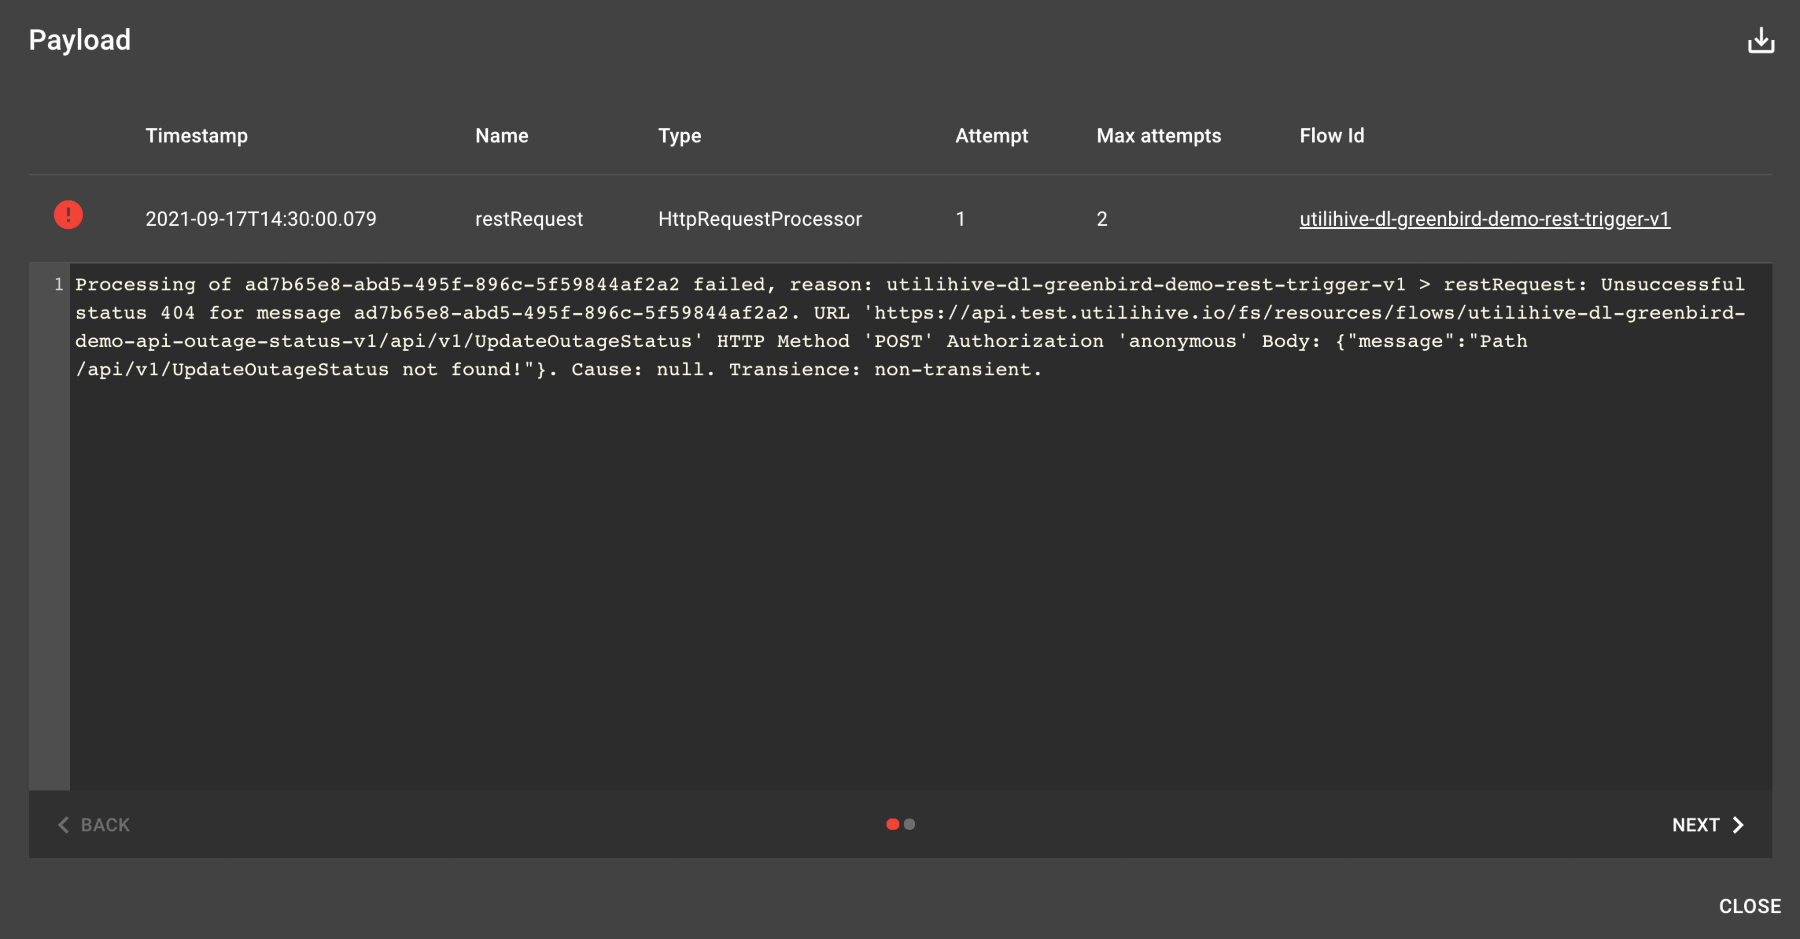
In this case, the processor attempted to make a POST request to another endpoint but received a 403 status. For easier reference, the error message can be seen in the following text:
Processing of ba47589f-38f2-4bc1-aed2-baa3ff776174 failed, reason: verification-rest-request-transience-override > restRequest: Unsuccessful status 403 for message ba47589f-38f2-4bc1-aed2-baa3ff776174 URL 'http://connect-resourceregistry/path-that-will-cause-403' HTTP Method 'GET' Authorization 'anonymous' Body: RBAC: access denied. Cause: null. Transience: transient.
Resubmitting Messages
If resubmitting traces is enabled for your organization, then all applicable flow traces will include a resubmit button ( ![]() ) in the Payload column.
However, a message is only resubmittable if the following conditions are met:
) in the Payload column.
However, a message is only resubmittable if the following conditions are met:
-
The flow in question is a handoff flow (meaning resubmission doesn’t occur on, for example, a REST-based flow but rather a downstream processing flow).
-
The flow has archived the payload of the source processor.
-
There is a separate
resubmitsflow that performs archive retrieval and forwards the message(s) to the resubmission flow. -
The predefined
insights-archive-userservice account is given access to theresubmitsflow and all downstream flows.
At a minimum, then, you would have four flows working together to save/archive the payload, retrieve it, and resubmit it. The following diagram outlines how these flows might collaborate:
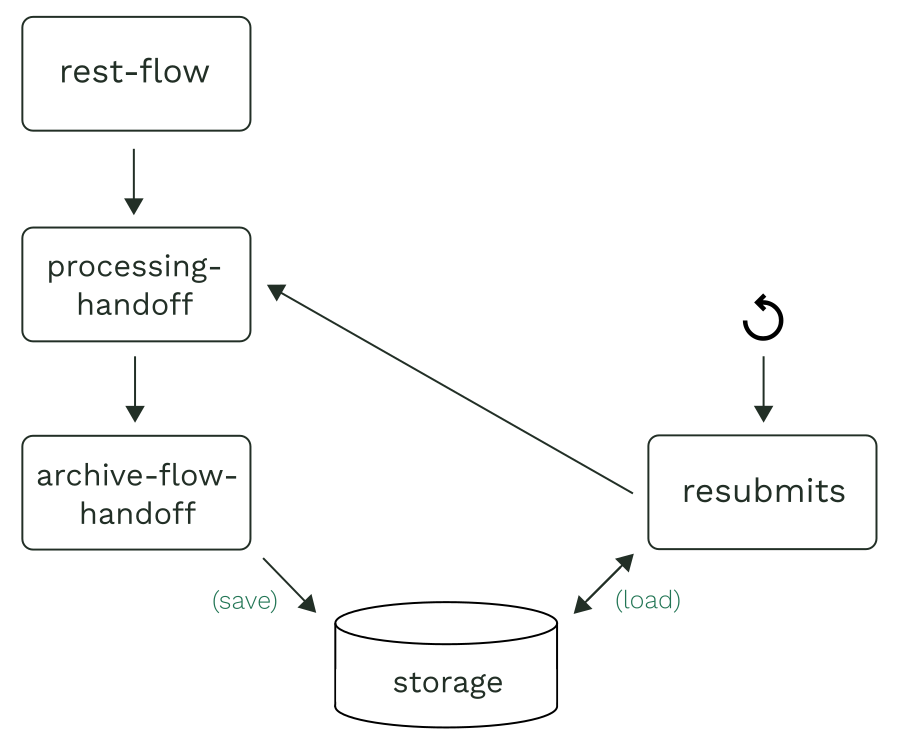
See the Archiving and Resubmission docs for specifics on the technical implementation.
Batch Resubmits
Batch resubmits can be performed by selecting the resubmit button at the top of the page next to the save ( ![]() ) button.
Batch resubmits are only available when the list of flow traces is filtered to a single flow ID, and the "Has payload" filter is applied.
For example:
) button.
Batch resubmits are only available when the list of flow traces is filtered to a single flow ID, and the "Has payload" filter is applied.
For example:

A batch resubmit is useful in cases where, for example, a system has been down for several hours, and failed messages have piled up. You would most likely want to apply additional filters (e.g., "Search: <date>", "State: FAILURE") to narrow down the batch resubmit to a specific set.